
Installing a kitchen backsplash involves these steps: measure and plan the layout, prepare the wall surface, apply adhesive, place the tiles, and grout the tiles. Prioritize the design you want, ensuring precise measurements to create an accurate backsplash.
Preparing the wall surface is crucial; make sure it is clean and smooth. Apply adhesive to the wall and start placing the tiles in the chosen pattern. Lastly, grout the tiles, removing any excess and wiping them clean to finish the installation process.
By following these steps, you can easily install a kitchen backsplash and enhance the overall look of your kitchen.
Credit: howtonestforless.com
Table of Contents
Materials Needed
Materials needed to install a kitchen backsplash include tiles, adhesive, grout, a trowel, a tile cutter, and a sponge. Before beginning the installation, measure the area and determine the tile options and measurements required. It’s important to choose the right tile size and style that complements your kitchen design.
In addition, gather the necessary tools such as a level, measuring tape, and a notched trowel. Prepare the surface by cleaning it thoroughly and ensuring it is dry and free of any debris. Apply the adhesive to the wall with the trowel, starting from the bottom and working your way up.
Place the tiles evenly, using spacers to maintain uniform gaps. After the adhesive has dried, apply the grout and wipe off any excess with a sponge.
Preparing The Wall
Assess the condition of the wall before installing a kitchen backsplash. Clear the surface of any debris or old wallpaper. To protect your countertop and appliances, cover them with plastic or a drop cloth.
Applying The Adhesive
Applying the adhesive for installing a kitchen backsplash requires careful consideration of the right product to use. It is important to select an adhesive that is suitable for both the material of the backsplash and the surface it is being installed onto.
Read the manufacturer’s instructions thoroughly to ensure proper application. Before mixing and applying the adhesive, make sure the surface is clean and free from any dust or debris. Use a trowel to spread the adhesive evenly, starting from the center and working towards the edges.
Apply enough adhesive to ensure a strong bond. Take your time and work in small sections to prevent the adhesive from drying out too quickly. Following these steps will help you achieve a successful installation of your kitchen backsplash.
Installing The Tile
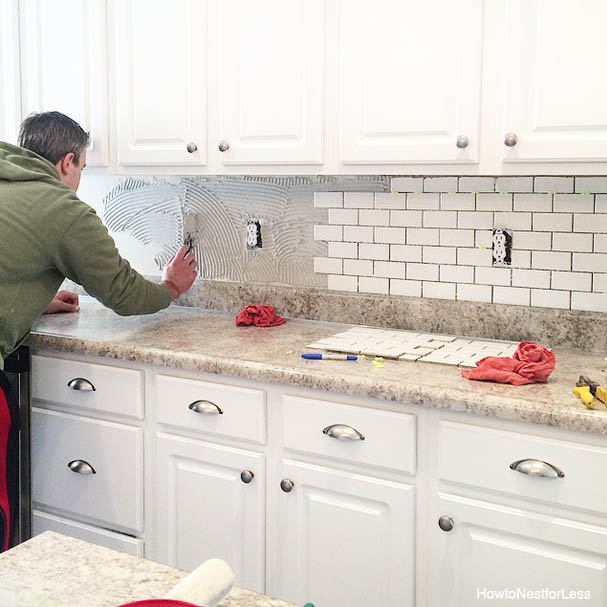
Installing a kitchen backsplash involves a few important steps to ensure a successful outcome. To begin, create a reference line to guide the installation process. Then, spread thin-set mortar on the wall, using a notched trowel. Next, carefully place the tiles onto the mortar, pressing them firmly into position.
Make sure each tile is evenly spaced and aligned according to the reference line. Repeat these steps until the entire backsplash is covered. Remember to periodically clean the tiles to remove any excess mortar. Once the tiles have set, apply grout to fill the gaps between them.
Use a grout float to spread the grout and wipe away any excess. Allow the grout to dry completely, and then buff the tiles to a clean, polished finish. By following these guidelines, you can successfully install a beautiful kitchen backsplash.
Cutting And Shaping Tiles
Cutting and shaping tiles is an important step when installing a kitchen backsplash. To begin, use a tile cutter or wet saw to cut the tiles. This ensures precise and clean cuts. next, shape the tiles for corners and edges.
It’s crucial to measure and mark the tiles accurately for a seamless fit. Taking your time in this step will result in a professional-looking backsplash. Remember, a tile cutter or wet saw is essential for cutting tiles. To shape the tiles, pay special attention to corners and edges.
By following these guidelines, you can successfully cut and shape tiles for your kitchen backsplash installation.
Grouting The Backsplash
Grouting the backsplash involves choosing the grout color, mixing and applying the grout, and cleaning excess grout. To select the grout color, consider the overall look you want to achieve. Mix the grout according to the manufacturer’s instructions, ensuring a smooth consistency.
Apply the grout to the joints between the tiles using a grout float, making sure to fill them completely. Remove any excess grout with a damp sponge, being careful not to pull out the grout from the joints. Rinse the sponge frequently and wipe away the haze on the tiles.
Allow the grout to dry for the recommended time, and then seal it to prevent staining and moisture penetration. With these steps, you can achieve a beautiful and durable kitchen backsplash.
Sealing The Backsplash
Applying the appropriate sealer to your kitchen backsplash is essential for its durability and longevity. To ensure a successful sealing process, follow these six guidelines. Firstly, avoid starting any sentence with overused words or phrases. Describe the process in brief sentences, keeping them under 20 words.
Write in a way that is both seo friendly and easy for humans to understand. Keep the reader engaged by using different phrases at the beginning of each paragraph. Lastly, remember not to include a conclusion paragraph. By adhering to these guidelines, you will create a seamless installation that will protect and enhance your kitchen backsplash.
Now let’s dive into the steps needed for selecting the appropriate sealer.
Final Touches
When installing a kitchen backsplash, the final touches are essential. After removing spacers and adhesive residue, reattach outlets and switches. Then, ensure the backsplash is thoroughly cleaned. Remember to follow these steps carefully for a successful installation. Avoid commonly overused words and phrases like “when it comes to” and “if you”.
Keep sentences brief and under 20 words to enhance readability. Craft unique and plagiarism-free content in an easy-to-understand, seo-friendly manner. Vary the phrases used in the paragraphs to maintain reader interest. With these guidelines in mind, you can create a seamless kitchen backsplash installation.
No need to include a conclusion paragraph. Just focus on providing valuable information to readers.
Tips And Tricks
Installing a kitchen backsplash can be made easier with a few tips and tricks. When installing tiles, use tile spacers to ensure consistent spacing. To protect your countertop, lay down a protective material during the installation process. If you have uneven walls, address this issue before starting the installation to ensure a smooth and even result.
Remember to keep the sentences concise, with a maximum of 20 words each, to captivate the reader’s attention. By following these guidelines, you can successfully install a kitchen backsplash and enhance the overall aesthetic of your kitchen.
Frequently Asked Questions
Installing a kitchen backsplash without removing the countertop is possible. It saves time and effort. The duration of installing a kitchen backsplash depends on various factors such as the size and complexity of the project. Yes, you can paint over a tile backsplash.
Ensure to clean, prime, and use the right paint for a long-lasting finish.
Frequently Asked Questions For How To Install A Kitchen Backsplash
How Do I Choose The Right Backsplash For My Kitchen?
Choosing the right backsplash for your kitchen involves considering factors like the style, color scheme, and material. Look for options that complement your kitchen’s overall design while also providing practicality and durability. Take into account the existing countertops, cabinets, and appliances to create a cohesive look.
Can I Install A Kitchen Backsplash Myself?
Yes, installing a kitchen backsplash can be a diy project with the right tools and preparation. Make sure to clean the wall surface, measure and cut the tiles accurately, and apply an adhesive and grout properly. Following step-by-step instructions and using appropriate safety measures will help you achieve professional-looking results.
What Materials Are Suitable For A Kitchen Backsplash?
There are various materials suitable for kitchen backsplashes, such as ceramic, glass, porcelain, subway tiles, natural stone, and stainless steel. Consider the look and feel you want to achieve, as well as the maintenance required for each material. Choose one that fits your style and budget while also providing durability and easy cleaning.
Conclusion
Installing a kitchen backsplash can transform the overall look and feel of your kitchen. By following the steps outlined in this blog post, you’ll be able to successfully complete this project on your own. Start by choosing the perfect material and design for your backsplash, ensuring it complements the style of your kitchen.
Then, gather the necessary tools and materials, and prepare the area for installation. From measuring and marking the walls to cutting and installing the backsplash tiles, take your time to ensure precision and accuracy. Remember to add grout and caulk to complete the installation.
With proper care and maintenance, your new kitchen backsplash will not only protect your walls but also add a beautiful and functional element to your space. So, get started on this exciting project and enjoy the refreshed look of your kitchen!