
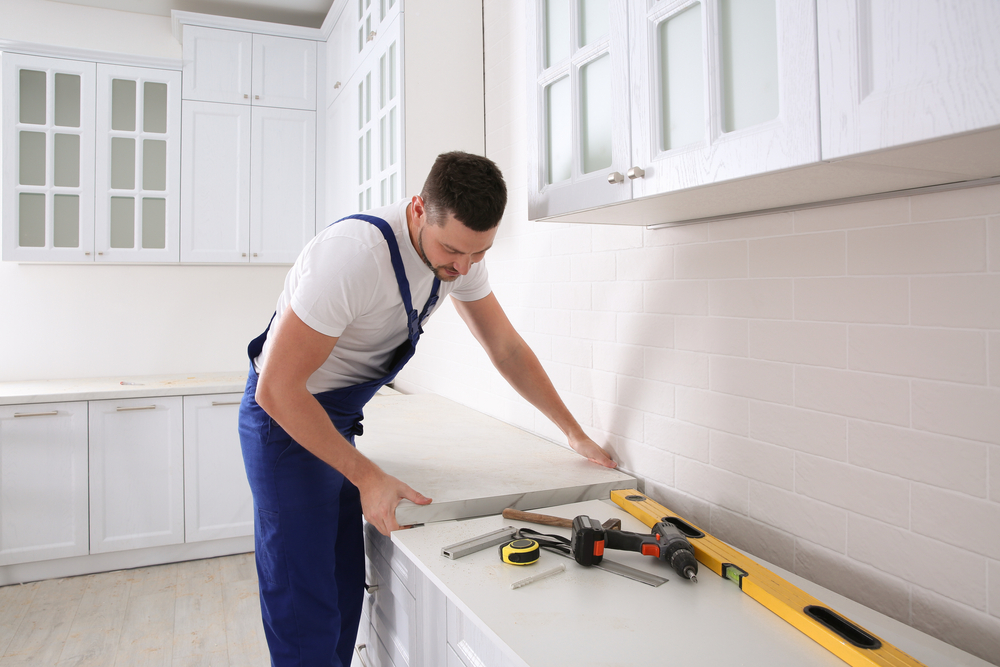
Kitchen countertop installation is a crucial part of kitchen remodeling, providing a functional and aesthetic surface for food preparation and other activities. There are numerous options available for countertop materials, including granite, quartz, laminate, and solid surface.
Each material has its own unique features and benefits, such as durability, heat resistance, and ease of maintenance. Before installation, proper measurements and preparation are necessary to ensure a seamless fit. Hiring a professional installer is recommended to ensure a high-quality installation.
With the right countertop and installation, a kitchen can be transformed into a beautiful and efficient space for cooking and entertaining.
Credit: www.rdmarble.com
Table of Contents
Preparing For The Installation
Ensuring The Right Materials And Tools
When it comes to kitchen countertop installation, having the right materials and tools is essential for a smooth and efficient process. Here are the key points to keep in mind:
- Measure the countertop space accurately to ensure you purchase the right amount of materials.
- Choose a countertop material that suits your style, budget, and maintenance preferences. Options include granite, quartz, solid surface, laminate, and more.
- Don’t forget to gather the necessary tools for the installation, such as a tape measure, circular saw, jigsaw, drill, clamp, level, and smoothing tools. These tools will help you achieve a professional-looking installation.
Measuring The Countertop Space
Accurate measurements are crucial when it comes to installing kitchen countertops. Follow these guidelines to measure your countertop space correctly:
- Start by measuring the length and width of the existing countertop using a tape measure. If you’re starting from scratch, measure the base cabinets to determine the dimensions of the countertop needed.
- Consider any obstacles that might affect the measurements, such as wall irregularities or appliances that protrude beyond the cabinets.
- Use a digital measuring tool or laser level to ensure precise measurements.
- Double-check your measurements and write them down for reference when purchasing materials.
Removing The Existing Countertop
Before installing a new countertop, you need to remove the existing one. Follow these steps for a successful removal process:
- Disconnect the sink, faucet, and other appliances connected to the countertop.
- Turn off the water supply and disconnect the plumbing beneath the sink.
- Remove any screws or adhesive holding the countertop in place. Use a screwdriver or pry bar to loosen them.
- Carefully lift the countertop, ensuring it doesn’t damage the cabinets or backsplash.
- Dispose of the old countertop responsibly, keeping in mind any local regulations for waste disposal.
By ensuring you have the right materials and tools, measuring the countertop space accurately, and removing the existing countertop correctly, you’ll be well-prepared for a successful kitchen countertop installation. So let’s dive into the exciting journey of transforming your kitchen with a brand new countertop!
Choosing The Perfect Countertop
Considering Different Materials
When it comes to kitchen countertop installation, one of the key decisions you’ll need to make is choosing the right material. With various options available, each offering its own benefits and drawbacks, it’s essential to consider the following materials:
- Granite: Known for its durability and natural beauty, granite countertops are resistant to scratches and heat. They come in a wide range of colors, making it easy to find the perfect match for your kitchen decor.
- Quartz: Engineered quartz countertops are popular due to their non-porous surface, which resists staining and requires little maintenance. These countertops are also available in a diverse array of colors and patterns.
- Marble: If you desire an elegant and luxurious look for your kitchen, marble countertops are a perfect choice. However, keep in mind that marble is prone to staining and requires regular sealing.
- Solid surface: Offering a seamless look, solid surface countertops are available in numerous color options. These countertops are resistant to stains and scratches, and any damages can be easily repaired.
- Butcher block: If you prefer a warm and natural look, butcher block countertops made from wood are an excellent choice. They provide a functional work surface and can be easily sanded and refinished when needed.
- Laminate: Laminate countertops are an affordable option that comes in an extensive range of designs and colors. They are low-maintenance and resistant to stains and heat, making them suitable for busy kitchens.
Evaluating Durability And Maintenance
When selecting a countertop material, it’s crucial to consider its durability and the level of maintenance required. Here are a few key points to keep in mind:
- Assess the material’s resistance to scratches, stains, and heat to ensure it can withstand everyday wear and tear.
- Consider the level of maintenance the countertop will require. Some materials, like quartz and solid surface, are low-maintenance and only require regular cleaning. On the other hand, materials like marble may require frequent sealing and special care.
- Evaluate the material’s lifespan and durability to determine if it will meet your long-term needs.
- Think about your lifestyle and how the countertop material will fit into it. If you have a busy household, you may want to opt for a material that is more resistant to stains and damage.
Finding The Right Style And Design
Aside from durability and maintenance, the style and design of your countertop play a significant role in enhancing the overall aesthetic of your kitchen. Consider the following factors when making your selection:
- Take into account the existing color scheme and design elements in your kitchen, as the countertop should complement the overall look.
- Think about the desired level of contrast or uniformity you want to achieve. Do you prefer a bold statement or a cohesive and harmonious design?
- Consider the edge profile options available for each countertop material. Different edge profiles can drastically impact the overall style.
- Be mindful of current trends, but prioritize a timeless design that will remain appealing for years to come.
Remember to take your time when choosing the perfect countertop material for your kitchen. By considering different materials, evaluating durability and maintenance, and finding the right style and design, you can ensure your countertop not only meets your functional needs but also enhances the overall aesthetic of your kitchen.
Hiring The Right Professionals
Researching And Comparing Contractors
Hiring the right professionals for your kitchen countertop installation is crucial to ensure a smooth and successful project. Here are some key factors to consider when researching and comparing contractors:
- Experience and expertise: Look for contractors with extensive experience in kitchen countertop installations. They should be knowledgeable about various materials, techniques, and potential challenges that may arise during the process.
- Portfolio and past projects: Review their portfolio and past projects to get an idea of their skills and craftsmanship. This can help you gauge their ability to handle your specific countertop requirements.
- Licensing and insurance: Verify that the contractor is licensed and insured. This will protect you from any liability in case of accidents or damages during the installation.
- Customer reviews and ratings: Check online platforms and review sites to read customer reviews and ratings of the contractors you’re considering. This can provide you with valuable insights into their professionalism, reliability, and quality of work.
- Communication and responsiveness: A contractor who communicates effectively and responds promptly to your inquiries and concerns is essential for a smooth collaboration. Good communication ensures that your expectations are met throughout the project.
Checking References And Reviews
Before finalizing your decision, it’s important to check references and reviews provided by the contractors. Here’s what you should consider:
- References: Ask the contractor for references from previous clients. Contact these references and ask about their overall experience, the quality of work provided, and whether they would recommend the contractor.
- Online reviews: In addition to the references provided, search for the contractor’s name and company online to find reviews on various platforms. Consider both positive and negative feedback to get a comprehensive understanding of their reputation.
- Professional associations and certifications: Look for contractors who are members of professional associations or have certifications in their field. This indicates their commitment to high standards and ongoing learning.
Getting Multiple Quotes
To ensure you receive a fair price for your kitchen countertop installation, it’s advisable to obtain multiple quotes. Here’s how to go about it:
- Research and shortlist: Research different contractors and shortlist those who meet your criteria in terms of experience, expertise, and reputation.
- On-site inspections: Invite the shortlisted contractors to visit your kitchen and assess the installation requirements. This allows them to provide you with accurate and detailed quotes.
- Detailed breakdown: Request each contractor to provide a detailed breakdown of the costs involved, including materials, labor, and any additional fees or charges.
- Compare quotes: Once you have received all the quotes, compare them carefully, taking into consideration the overall price, quality of materials, timeline, and the contractor’s reputation.
Remember, hiring the right professionals for your kitchen countertop installation will ensure a beautiful and functional space that you’ll enjoy for years to come.
Preparing The Countertop Surface
Cleaning And Prepping The Area
Before installing your kitchen countertop, it is crucial to properly clean and prep the area to ensure a smooth and successful installation process. Here are the key steps to take in preparing the countertop surface:
- Clear the space: Remove any objects or appliances from the countertop area to create a clean workspace. This will make it easier to reach all parts of the surface and minimize the chances of damage or accidents during installation.
- Clean thoroughly: Use a gentle, non-abrasive cleaner to remove any dirt, grease, or stains from the existing countertop. Make sure to rinse and dry it thoroughly before moving on to the next step. A clean surface will provide better adhesion for the new countertop material.
- Smooth out imperfections: Inspect the countertop surface for any bumps, scratches, or unevenness. Sand down any imperfections using sandpaper or a sander to create a level and even surface. This step is crucial for ensuring a proper fit and flawless installation.
- Check for stability: Before proceeding, ensure that the cabinets supporting the countertop are stable and level. If needed, make adjustments to level the cabinets and subtop to provide a solid foundation for the countertop installation.
Leveling The Cabinets And Subtop
Properly leveling the cabinets and subtop is essential for a seamless and long-lasting countertop installation. Here are the key points to consider:
- Measure and mark: Begin by measuring the height of the cabinets and making reference marks on the walls to establish the desired height for the countertop. This will help you ensure consistency and accuracy throughout the installation process.
- Adjust cabinet legs: If your cabinets have adjustable legs, use a level to adjust them until they are perfectly level. This step will help prevent any future issues such as sagging or cracking of the countertop due to an uneven support system.
- Shim the cabinets: In cases where the cabinets are not level, use shims to raise or lower the cabinets as needed. Shims are thin, wedge-shaped pieces that can be inserted between the cabinet and the subtop to level them.
- Recheck for stability: Once the cabinets are leveled, double-check their stability by gently pushing and shaking them. Any instability could cause problems during countertop installation, so make sure everything is secure and sturdy.
Creating A Template For Cutting
Creating a template is a crucial step in ensuring accurate cuts and a precise fit for your kitchen countertop. Here are the key steps to follow:
- Measure the countertop area: Use a measuring tape to measure the dimensions of your countertop area accurately. Take into account any sinks, appliances, or other fixtures that will be included in the countertop design.
- Transfer measurements to a template: Transfer the measurements onto a large piece of cardboard or thin plywood to create a template. Use a pencil or marker to trace the shape of the countertop, including any cutouts or curves.
- Double-check measurements: Before proceeding with any cutting, double-check your measurements to ensure accuracy. Mistakes at this stage could lead to costly errors during countertop installation.
- Cut the template: Using a jigsaw or circular saw, carefully cut along the traced lines of the template. Take your time and follow safety precautions when using power tools.
- Test fit the template: Place the template on the countertop area to check for proper fit and alignment. Make any necessary adjustments to the template to ensure a seamless fit before proceeding with cutting the actual countertop material.
Remember, proper preparation is key to a successful kitchen countertop installation. Take the time to clean and prep the area, level the cabinets and subtop, and create an accurate template for cutting. Following these steps will ensure a smooth and professional-looking installation that will stand the test of time.
Cutting And Customizing The Countertop
When it comes to kitchen countertop installation, cutting and customizing the countertop is a crucial step. Properly measuring, marking, and cutting the countertop ensures a precise fit and a professional finish. Here are the key points to keep in mind:
Accurately Measuring And Marking
- Before cutting the countertop, it is essential to accurately measure the dimensions of the area where it will be installed.
- Measure the length, width, and depth of the countertop area, taking into account any appliances or fixtures that need to be accommodated.
- Use a straightedge and a pencil to mark the cutting lines on the countertop surface, ensuring they align with the measurements taken.
- Double-check the measurements and markings for accuracy before proceeding to cut the countertop.
Using A Circular Saw Or Jigsaw
- A circular saw or jigsaw is commonly used to cut kitchen countertops, depending on the material being used.
- Make sure to choose the appropriate blade for the specific material of the countertop.
- Secure the countertop firmly in place before beginning the cutting process.
- When using a circular saw, start the cut from the edge and guide the saw along the marked cutting line, applying consistent pressure.
- Use clamps to stabilize the countertop during the sawing process and prevent vibrations.
- If using a jigsaw, start the cut from a pre-drilled hole on the interior of the countertop, then follow the marked cutting line.
- Take your time and proceed with caution to ensure straight, clean cuts without damaging the countertop material.
Finishing The Edges And Corners
- Once the countertop is cut to size, it’s time to finish the edges and corners for a polished look.
- Use a router with a decorative bit to create smooth and stylish edge profiles.
- Sand the edges of the countertop to remove any roughness or imperfections, starting with a coarse grit sandpaper and gradually working your way to finer grits.
- Pay extra attention to the corners, ensuring they are properly smoothed and rounded.
- Consider adding corner protectors or trim pieces to enhance the durability and aesthetic appeal of the countertop.
- Finish off the edges and corners with an appropriate sealant or polish, depending on the material used, to protect against moisture and stains.
By following these steps and taking the time to accurately measure, mark, and cut your countertop, you’ll ensure a seamless installation that adds both functionality and beauty to your kitchen. Don’t rush the process and remember to prioritize safety at all times.
Happy countertop customization!
Installing The Countertop
Applying Adhesive Or Caulk
Before installing your kitchen countertop, it’s important to apply adhesive or caulk to ensure a secure and long-lasting installation. Here are the key points to keep in mind:
- Choose the right adhesive or caulk: Use a high-quality adhesive or caulk specifically designed for countertop installation. This will ensure a strong bond and prevent any damage or movement over time.
- Clean the surface: Thoroughly clean the countertop base and the underside of the countertop to remove any dust, debris, or grease. A clean surface will provide optimal adhesion and a smooth installation.
- Apply adhesive or caulk strategically: Apply a generous amount of adhesive or caulk along the edges and corners of the countertop base. This is where the most stress and weight will be concentrated. Also, apply small beads of adhesive or caulk in the center of the base for added support.
- Spread and level: Use a putty knife or a trowel to spread the adhesive or caulk evenly on the countertop base. Make sure to level it to create a flat and stable surface for the countertop.
- Follow the manufacturer’s instructions: Different adhesives and caulks may have specific instructions regarding drying time, temperature conditions, and application techniques. Always refer to the manufacturer’s guidelines for best results.
Aligning And Securing The Countertop
Proper alignment and securing of the countertop are critical to its stability and functionality. Here’s what you need to do:
- Lift the countertop in place: With the help of an assistant, carefully lift the countertop and position it onto the base. Take care to align it accurately with the edges and corners.
- Check for levelness: Use a level to ensure that the countertop is perfectly level both lengthwise and widthwise. Adjust as needed by shimming under the countertop to achieve a level surface.
- Secure the countertop: Once the countertop is level, secure it to the base using appropriate methods. This may involve using screws from underneath or clamps to hold it firmly in place.
- Use reinforcement if required: Depending on the countertop material and weight, additional reinforcement may be necessary. Consult with a professional or refer to the manufacturer’s recommendations for proper reinforcement techniques.
- Seal the edges: Lastly, seal the edges of the countertop with silicone caulk to prevent moisture from seeping in. This will safeguard the countertop against water damage and enhance its longevity.
Checking For Proper Alignment
After the countertop is installed, it’s crucial to check for proper alignment to ensure a flawless finish. Consider the following:
- Verify alignment with adjacent surfaces: Check that the countertop aligns seamlessly with adjacent surfaces, such as walls and cabinets. Any inconsistencies should be addressed promptly to achieve a cohesive and aesthetically pleasing appearance.
- Ensure even overhangs: If your countertop has overhangs, make sure they are evenly distributed on all sides. Measure and adjust if necessary to maintain symmetry and balance.
- Confirm a secure fit: Test the countertop by gently applying pressure along its length and corners. It should feel solid and not shift or wobble. If any movement is detected, reevaluate the installation and secure it further if needed.
- Inspect seams and joints: Examine the seams and joints between countertop sections for any gaps or misalignments. If necessary, apply additional adhesive or caulk and smooth it out for a seamless connection.
By following these steps and ensuring proper alignment, your kitchen countertop installation will not only be visually appealing but also sturdy and reliable. Take your time during the installation process to achieve the best possible results.
Sealing And Finishing Touches
Sealing The Countertop Surface
Once you’ve installed your new kitchen countertop, it’s crucial to seal the surface properly. Sealing helps protect the countertop from stains, scratches, and heat damage, ensuring its longevity and enhancing its appearance. Here are the key points to keep in mind when sealing your countertop surface:
- Clean the surface: Before applying any sealant, make sure the countertop is thoroughly clean. Remove any dust, debris, or residues using a mild cleaning agent or soap and water. Let it dry completely before proceeding.
- Choose the right sealant: There are various sealant options available, including penetrating sealers and topical sealers. Consider the type of material your countertop is made of (such as granite, marble, or quartz) and the level of protection you desire. Research different sealants and select the one that best suits your needs.
- Apply the sealant: Follow the manufacturer’s instructions for applying the sealant. Use a paintbrush or sponge to evenly apply the sealant on the countertop surface. Be careful not to miss any spots, especially around edges and corners.
- Allow drying time: After applying the sealant, allow it to dry for the recommended amount of time. This may vary depending on the product used. Avoid using your countertop during this drying period to ensure proper sealing and curing.
- Test the effectiveness: Once the sealant is fully dry, perform a water test to check its effectiveness. Sprinkle some water droplets on the countertop surface and observe if they bead up or absorb quickly. If the water beads up, the sealant is working correctly. If it absorbs quickly, you may need to apply an additional coat of sealant.
Installing Sink And Faucet
After sealing the countertop, the next step is to install the sink and faucet. This part of the process requires careful attention to ensure proper functionality and prevent any leaks or damage. Here are the key points to consider when installing your sink and faucet:
- Choose the right sink and faucet: Before installation, ensure that the sink and faucet you have selected are compatible with your countertop. Measure the size and dimensions required for the installation to ensure a proper fit.
- Cut the sink and faucet holes: Using a drill and appropriate saws, carefully cut out the holes on the countertop for the sink and faucet. Take your time and follow the manufacturer’s instructions to ensure accuracy.
- Position the sink and faucet: Carefully place the sink and faucet into their respective holes. Ensure that they are level and properly aligned with the countertop surface. You may need an assistant for this step to ensure stability.
- Install mounting hardware: Use the provided mounting hardware to secure the sink and faucet in place. Follow the manufacturer’s instructions for each specific model. This step will help ensure stability and prevent any movement or leaks.
- Connect plumbing and test for leaks: After secure installation, connect the plumbing lines to the sink and faucet. Double-check all connections and ensure that they are tight and properly sealed. Turn on the water supply and test for any leaks. Make any necessary adjustments or repairs if needed.
Applying Trim And Caulking
To complete the finishing touches of your kitchen countertop installation, applying trim and caulking is essential. This step adds both aesthetic appeal and protection against moisture and dirt accumulation. Here are the key points to consider when applying trim and caulk:
- Choose the right trim: Select trim materials that complement the style and design of your kitchen. Common options include wood, metal, or pvc trims. Measure and cut the trim pieces to fit the edges of your countertop accurately.
- Attach trim pieces: Apply an adhesive suitable for your specific trim material and attach the trim pieces along the edges of the countertop. Take your time to ensure precise placement and alignment. Use clamps or tape to hold the trim in place until the adhesive dries.
- Apply caulk: Use a high-quality silicone caulk to seal any gaps between the countertop, trim, and backsplash. Apply a thin and even bead of caulk along the edges, smoothing it with a caulk tool or your finger for a neat finish. Wipe away any excess caulk with a damp cloth.
- Allow drying time: Give the caulk sufficient time to dry and cure before using your countertop. This may take several hours or even a day, depending on the product used. Avoid touching or putting any weight on the caulked areas during this period.
By following these steps and paying attention to the sealing, sink and faucet installation, as well as applying trim and caulking, you can ensure a successful and professional-looking kitchen countertop installation. Take your time, follow the instructions carefully, and enjoy the beautiful and functional addition to your kitchen!
Maintaining And Caring For Your Countertop
Cleaning and removing stains:
- To keep your kitchen countertop looking its best, regular cleaning is essential.
- Use a mild soap or a ph-neutral cleaner to avoid damaging the surface.
- Wipe down the countertop with a soft cloth or sponge, and be sure to rinse thoroughly.
- For tougher stains, create a paste by combining baking soda and water, and gently scrub the affected area.
- Avoid using abrasive cleaners, as they can leave scratches or dull the surface of your countertop.
Avoiding damage from heat and scratches:
- Protect your countertop from heat damage by using trivets or hot pads for hot pots and pans.
- Avoid placing hot items directly on the surface, as extreme temperatures can cause cracks or discoloration.
- Be careful when handling sharp objects, such as knives or utensils, to prevent scratching the surface.
- Consider using cutting boards to protect your countertop from cuts and scratches.
Regular maintenance tips:
- Seal your countertop regularly to prevent stains and maintain its appearance.
- Follow the manufacturer’s instructions for sealing frequency and the type of sealant to use.
- Avoid using harsh chemicals or abrasive scrubbers that can damage the sealant.
- Keep your countertop dry by wiping up spills promptly to prevent water damage and staining.
- Consider using a natural stone cleaner specifically designed for your countertop material to enhance its longevity.
By following these cleaning and maintenance tips, you can ensure that your kitchen countertop remains in excellent condition for years to come.
Frequently Asked Questions For Kitchen Countertop Installation
Is It Necessary To Hire A Professional For Kitchen Countertop Installation?
Yes, it is highly recommended to hire a professional for kitchen countertop installation. They have the expertise, tools, and knowledge to ensure that the installation is done correctly, avoiding any potential issues or damage. Additionally, professionals are familiar with local building codes and regulations, ensuring the installation meets all safety standards.
How Long Does It Take To Install Kitchen Countertops?
The duration of kitchen countertop installation depends on various factors, such as the size of the kitchen, the complexity of the countertops, and the type of material being used. Generally, it can take anywhere from a few hours to a few days to complete the installation process.
It is recommended to consult with your chosen professional for a more accurate timeline.
What Are The Different Types Of Kitchen Countertop Materials Available?
There is a wide range of kitchen countertop materials available, each with its own unique characteristics and advantages. Some popular options include granite, quartz, marble, laminate, and butcher block. It’s important to consider factors such as durability, maintenance, and aesthetics when choosing the right material for your kitchen countertops.
Conclusion
Kitchen countertop installation is a significant decision that can enhance the functionality and aesthetic appeal of your kitchen. When considering the installation process, it is crucial to select a suitable material that suits your needs and preferences. By opting for durable and easy-to-maintain materials like granite, quartz, or marble, you can ensure the longevity of your countertops.
Additionally, enlisting the help of professionals can guarantee a seamless installation and minimize any potential issues. Remember that proper maintenance, such as regular cleaning and avoiding harsh chemicals, is essential to preserve the beauty and functionality of your countertops. Taking these factors into account, your kitchen countertop installation can bring new life to your kitchen space and increase the value of your home.

i am Jennifer. A post graduate in finance from University of Illinois at Urbana,Champaign at United States. I have a great passion in writing about Kitchen appliances & ideas more than 10 years. All that essentials about cooking i like to demonstrate through my articles. People who have largely interested about this may directly benefited by all these posts.